• Home
  • About
  • Food&Travel
  • GIRLYSTUFF
  • EVERYTHINGINBETWEEN
  • Contact
www.hannahtan.com |

Making The Difference

  • Home
  • About
  • Food&Travel
  • GIRLYSTUFF
  • EVERYTHINGINBETWEEN
  • Contact

Kung Pao Squid Pasta

Preparation time: 10 minutes

Cooking time: 10 minutes

Serves: 2 portions 


Ingredients

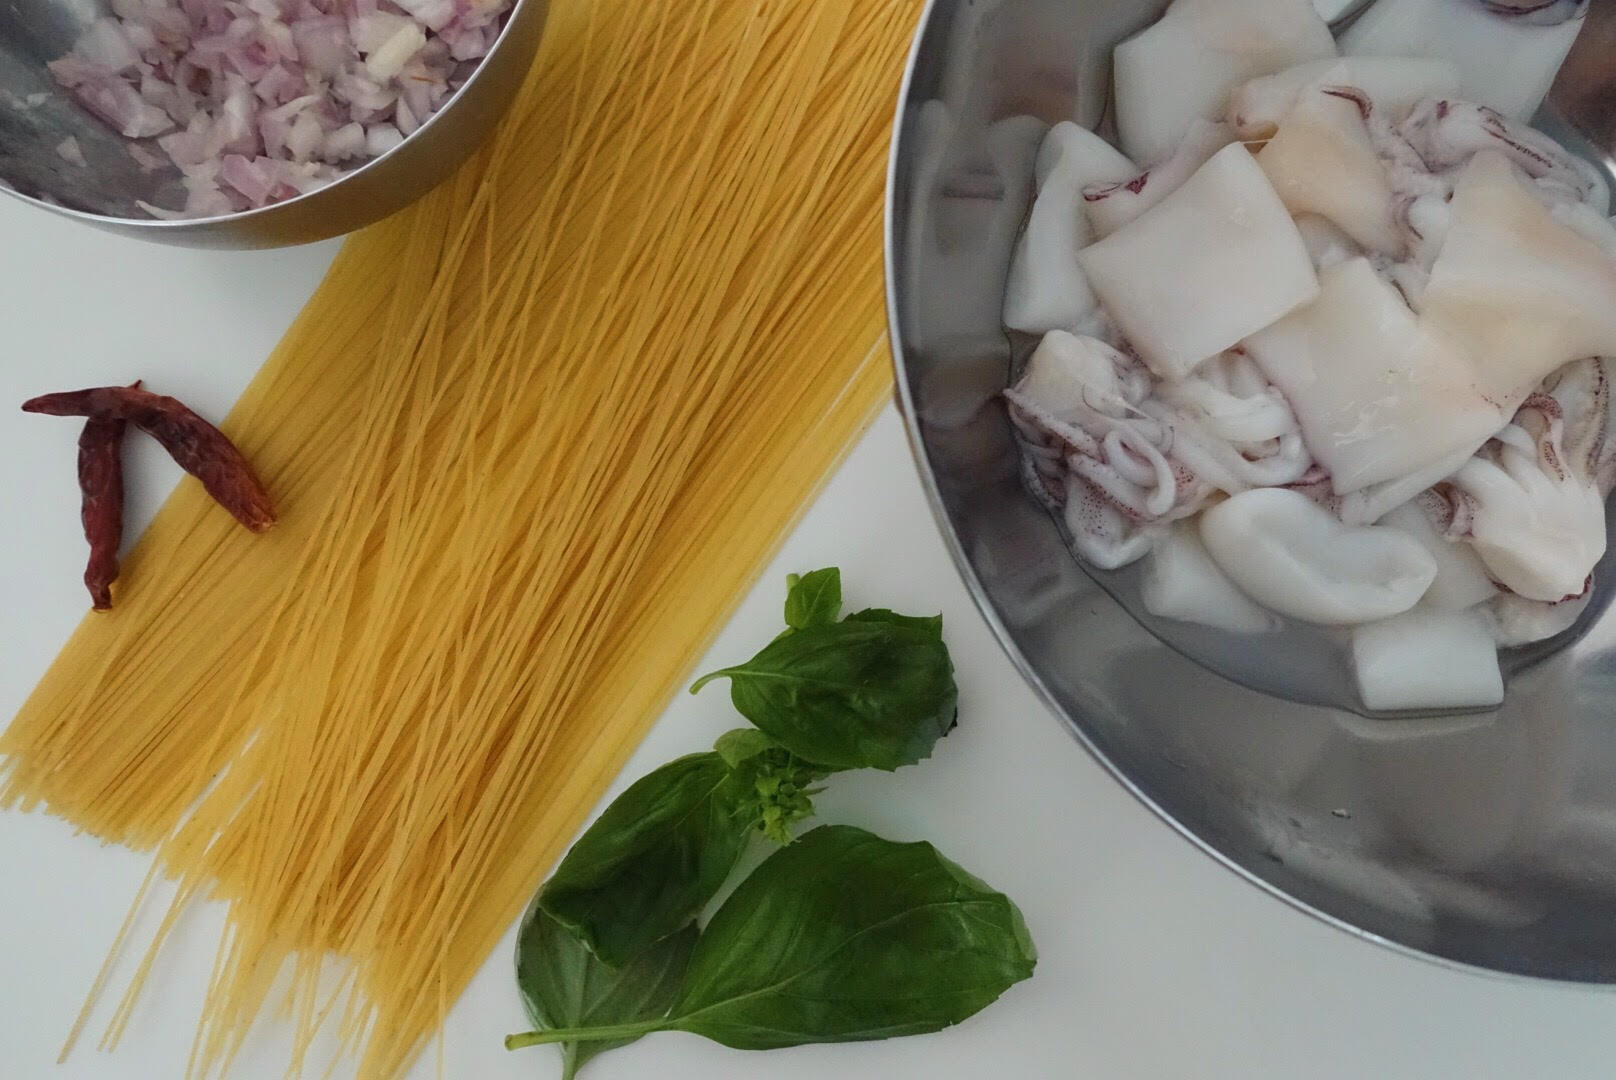
  • 2 serving portions of dry angel hair pasta, or spaghetti, whichever you prefer (a 1-inch diameter bunch of dry pasta should give you 1 portion)
  • ½ tablespoon of olive oil
  • ½ an onion (chopped finely/minced)
  • 5 dried red chilies (rinsed and drained completely; use half of the quantity if your dried chilies are longer in size)
  • 4-5 big squids (cleaned, peeled, deveined, cut into 2.5 to 3-inch lengths and marinated in 1 teaspoon of sugar)
  • 2 Spring onions (chopped, reserve ¾ for cooking and ¼ for garnishing) OR fresh basil

#htNOTE: If your tolerance to spice isn’t great, cut along the length of the dried chilli and remove the seeds.

View fullsize Kung Pao pasta 3.jpg
View fullsize Kung Pao pasta 2.jpg

Kung Pao Sauce

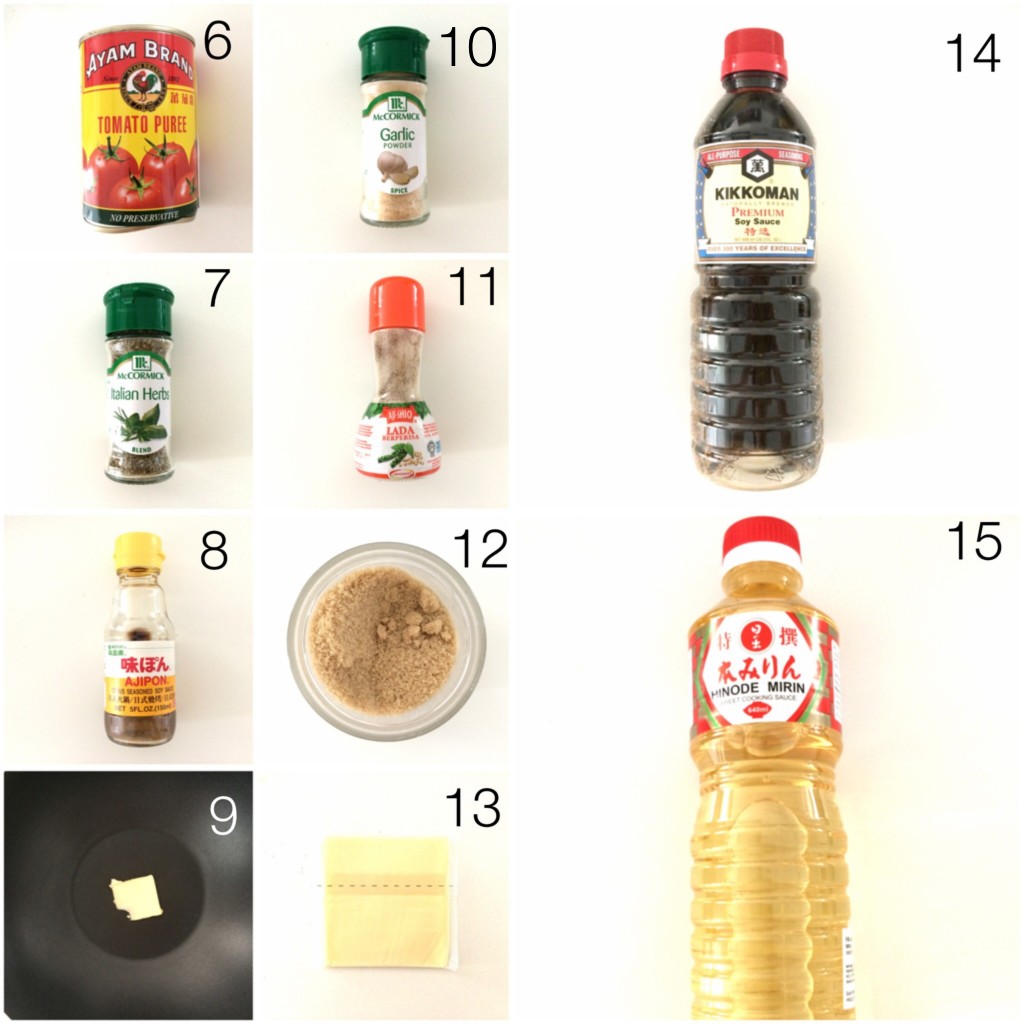
  • 4 tablespoons of light soy sauce
  • 1 tablespoon of sweet thick soy sauce (I used ABC Kecap Manis for this)
  • 5 tablespoons of water
  • 2 tablespoons of oyster sauce
  • 3 dashes of white pepper
  • 2 dashes of garlic powder
  • 1 tablespoon of Chinese black vinegar (preferred) or rice vinegar or Apple Cider vinegar
  • ½ teaspoon of sugar (add a bit more if you prefer it to be sweeter)
  • 1 tablespoon of Japanese mirin (optional)

#htNOTE: Dip your finger into the sauce (after thoroughly mixing) to taste and see if you’re okay with the taste. If you’re like me and prefer it to be a tad sweeter, add an extra ¼ to ½ tablespoon of sugar according to your preference.


Cooking

  1. Mix the Kung Pao sauce ingredients in a bowl and set aside.
  2. To cook the pasta, pick a roomy pot that gives the pasta plenty of space to move; and fill it up with 2-3 litres of cold/room temperature water. Using plenty of water helps to prevent the pasta from sticking together by quickly washing away the exuded starch.
  3. Bring the water to a full, rolling boil. When the water has come to a full boil, add about 12 - 16 tablespoons of kosher (coarse) salt, or until the water tastes like "sea water". Be generous with the salt. This may seem like a lot, but it is necessary for getting the pasta properly seasoned. Plus, most of the salt drains off with the water. Nevertheless, if you are on a sodium restricted diet, please follow your doctor’s orders before adding salt. Do NOT add oil of any kind. Oil has the unwanted effect of coating the pasta so the sauce will not stick. 
  4. Add the pasta, all at once, to the boiling salted water, and keep the heat high to bring the water back to the boil as quickly as possible.
  5. Keep stirring the pasta until they are just flexible but still quite firm (usually about a 1/3 of the normal cooking time).
  6. Drain immediately, and rince in ice cold water, then drain again and set aside.
  7. Meantime, clean and dry your wok thoroughly, and heat it over high flame until it starts to smoke.
  8. Put the olive oil into the wok and add the minced onions first. Stir-fry for a few seconds before adding the dried red chilies. Stir-fry until you smell the spicy aroma from the dried red chilies.
  9. Add in the Kung Pao sauce mix then immediately bring the heat down a notch.
  10. Add in the squid and stir fry for less than a minute (once the edges start curling in) and dish out the squid immediately so that it doesn’t overcook. Set aside. At this point your squid should be almost but not entirely cooked.
  11. Add in the 1/3 cooked pasta and mix into the sauce using a fork (this will also help to separate the pasta in the sauce). Keep stiring/mixing until the sauce is absorbed into the pasta, or until the pasta is "al dente" (it should have a slight resistance or chewy texture when biting into it, but it should also not be soft, overdone, or have a hard center).
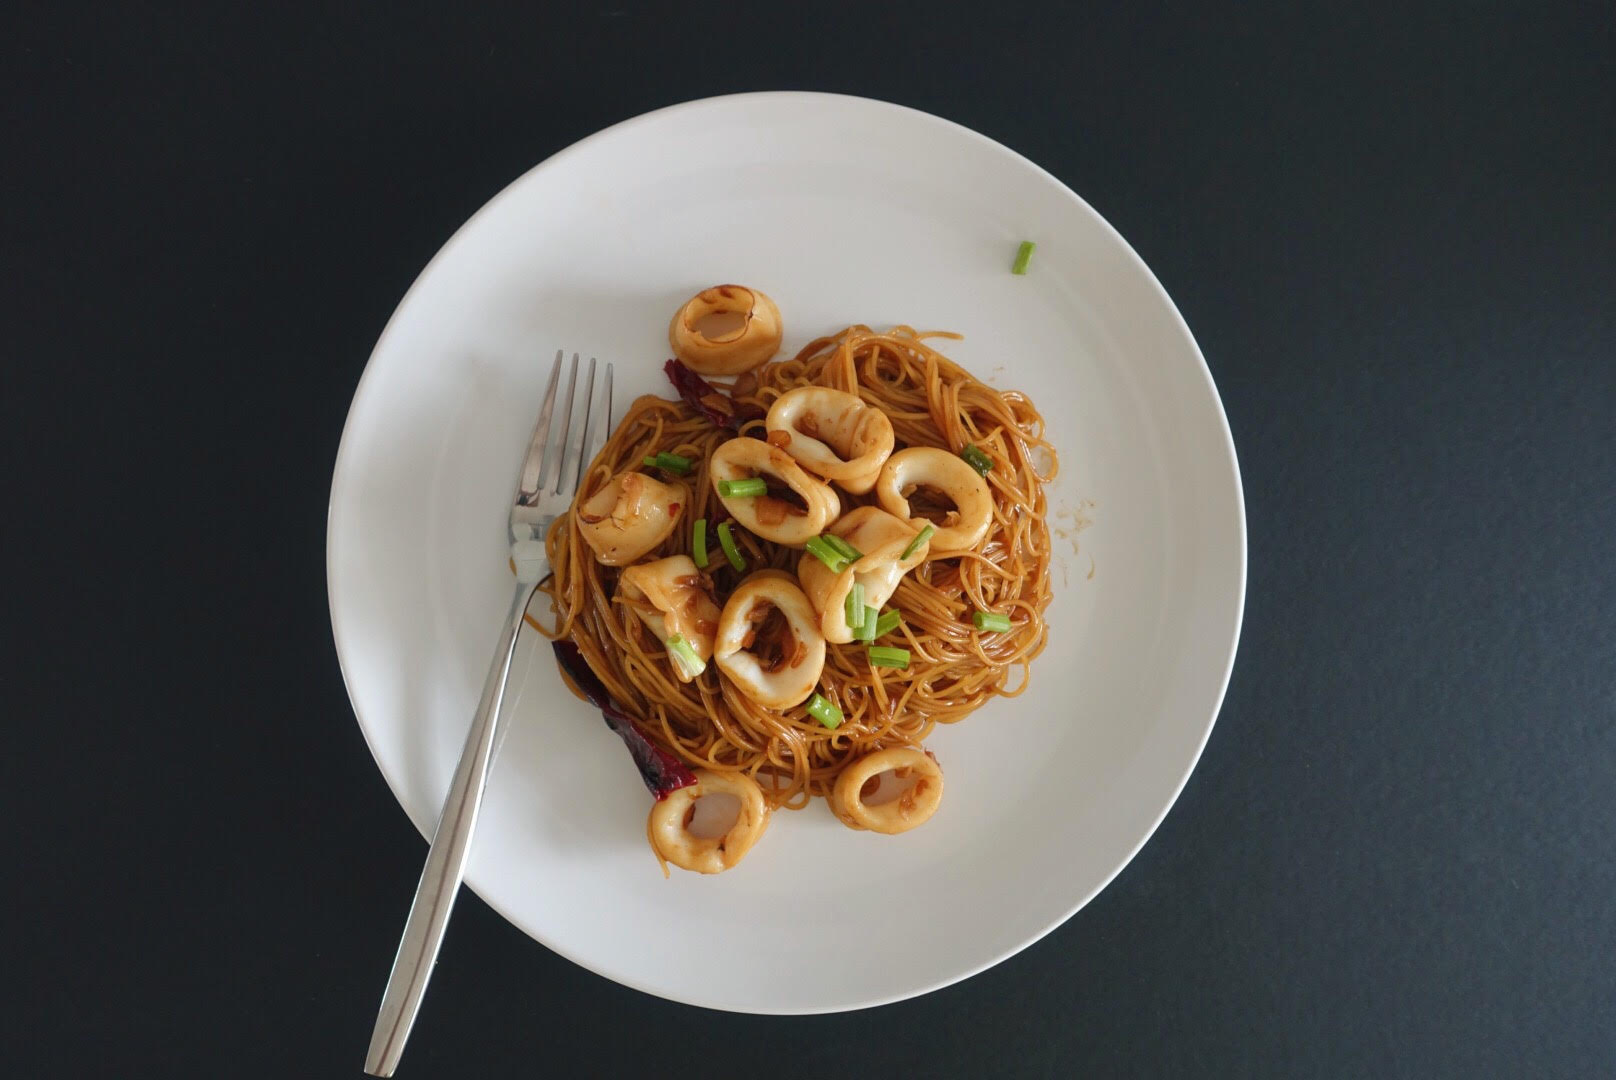
  12. Test, it should be tasty on its own. Once almost done, add the ¾ portion of spring onions (or fresh basil) and squid, and mix until squid is cooked.
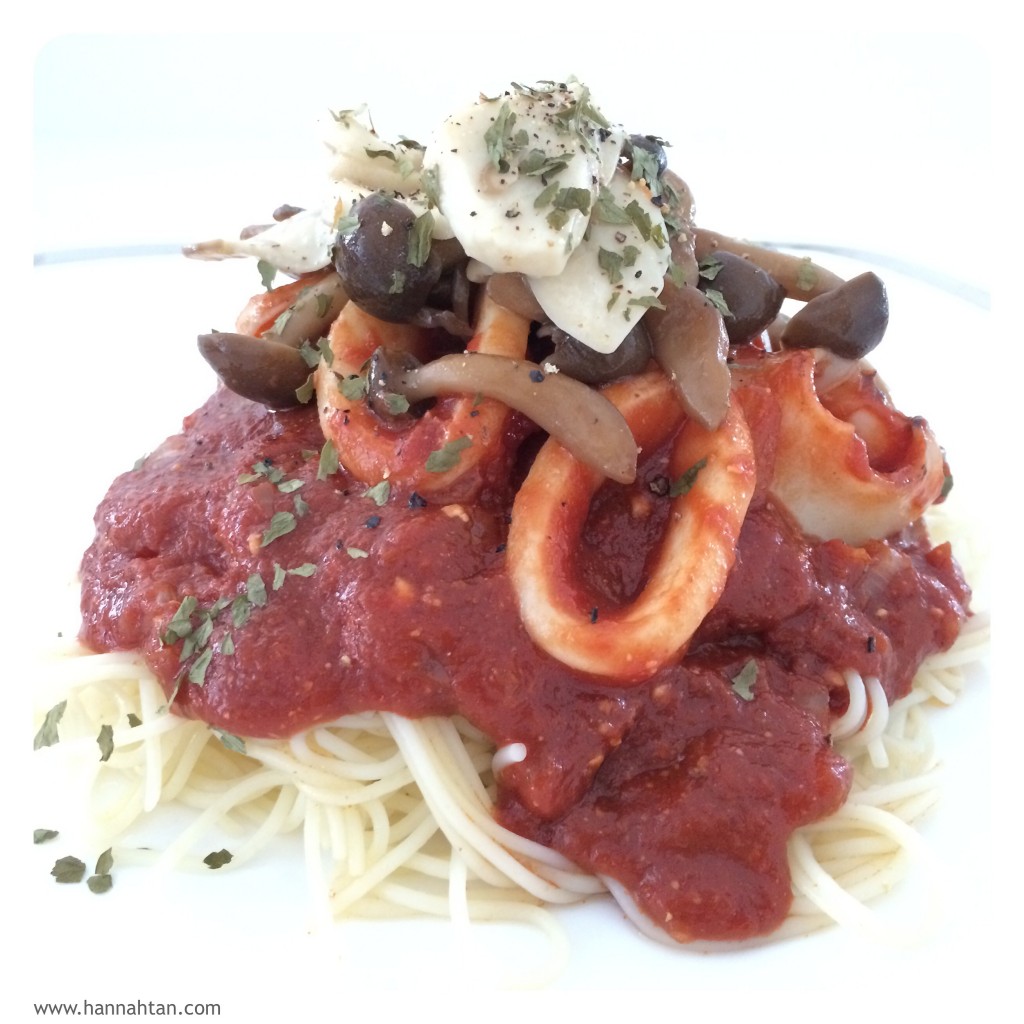
  13. Dish out and garnish with the ¼ portion of spring onions. Serve with a dash of black pepper if desired.

Reference: http://whatscookingamerica.net/Pasta_Rice_Main/pasta.htm


Use the comment box below if you have any questions and do let us know how your Kung Pao Squid Pasta turns out. Happy experimenting fellow foodies! :-D


Penang Char Kuey Teow recipe HERE


Click here for #OOTDs and other GIRLY STUFF


Source: http://www.hannah.today/homecooked-recipes...
tags: Kung Pao, kung po, kang pao, kung pau, squid, pasta, angel hair, spaghetti., spaghetti, asian, fusion, cook, cooking, homecooked, homecooking, home cook, home cooking, spicy, yum, yummy, taste, hannah, hannah tan, malaysian, sauce, recipe, recipes, fresh, flavor, foodie, flavours, flavour, flavors, food, htfood, wife, wok, how to, stir fry, diary of a wife, italian, kitchen, DIY, calamari, chilli, noodles, chinese, soy, spice, plate, simple, tasty, delicious, delish, fast, quick
categories: Homecooking, Recipe, Asian, Fusion, Pasta
Thursday 10.08.15
Posted by Hannah Tan
 

Penang Char Kuey Teow

[Modified version of http://rasamalaysia.com/char-kuey-teow/2/]

Preparation time: 30 minutes

Cooking time: 10-15 minutes

Serves: 6-7 portions


Ingredients:

  • 500 grams of fresh tiger prawns (shelled and submerged in ice cold water with 2 tablespoons sugar for 20 minutes, then drained completely)
  • 500 grams of fresh flat rice noodles/'kuey teow' (completely loosened with no clumps, drained completely)
  • 500 grams of fresh bean sprouts (rinsed with cold water and drained completely)
  • 100 grams of Chinese chives (remove about 1-inch from the base and cut into 2-inch lengths)
  • 8-10 cloves of garlic (chopped finely)
  • 7 teaspoons of ‘chai por’/preserved turnip (rinsed and drained completely) – this ingredient is key to get the best taste out of your Char Kuey Teow

#htNOTE: It is important that all your ingrediants are drained completely, to ensure that your Char Kuey Teow is dry; unless of course, you’re experimenting with a variation of ‘Kuey Teow Basah’.

View fullsize FullSizeRender 23.jpg
View fullsize 'chai por'
View fullsize Chinese chives
View fullsize 'kuey teow'


Optional extras:

  • 2 Chinese sausages/'lap cheong' (sliced diagonally)
  • 500 grams of fresh cockles (shelled)
  • 8 eggs (1 per serving)
  • Banana leaves (cut and cleaned) for food presentation


For the Chili Paste:

  • 1 oz./28 grams of dried red chiles (soaked in water, then seeded and drained completely)
  • 2 fresh red chilies (seeded)
  • 3 small shallots (peeled and sliced)
  • A pinch of salt


For the Sauce (mix well):

  • 5 tablespoons of light soy sauce
  • 1 ½ tablespoons of dark soy sauce
  • ½ teaspoon of fish sauce
  • ½ teaspoon of salt
  • 2 dashes of white pepper powder
  • 1 tablespoon of white sugar

#htNOTE: Dip your finger into the sauce (after thoroughly mixing) to taste and see if you’re okay with the taste. If you’re like me and prefer it to be a tad sweeter, add an extra ½ tablespoon of sugar.


Chilli Paste Preparation

  1. Grind all the ingredients of the chili paste in a food processor until fine.
  2. Heat up a wok with 1 teaspoon of oil and stir-fry the chili paste until aromatic. Dish out and set aside.

#htNOTE: After cooking the Char Kuey Teow, you can store the remaining chilli paste (if any left) in the freezer for over a month.


Cooking

#htNOTE: The following instructions will guide you on making 2 portions at a time. If you’re trying this at home for the first time, I’d recommend you do this (as opposed to putting everything in for all 7 servings) so that you’ll still have enough ingrediants to make a fresh batch in case you decide to adjust the taste/do things differently the next round.

Also if you don’t plan to cook all 7 servings at once, the ingrediants can be stored in the fridge for when you need them at a later time.

  1. Clean the wok thoroughly and place over high heat until it starts to smoke. Add 1 tablespoon of oil/lard into the wok followed by 1 tablepoon of chopped garlic, and do a quick stir.
  2. As the garlic starts to brown (within the next few seconds), turn the heat down a notch and throw in 1 tablespoon of ‘chai por’. Stir immediately to avoid the ‘chai por' from “popping” out of the wok (if it gets too intense and unmanageable, just turn the heat down).
  3. Add in a few slices of Chinese sausage (optional) and stir for a few seconds.
  4. Add in 5-6 prawns and stir for a few seconds until the prawns start to change colour, dish out the prawns immediately and set aside to avoid overcooking them.
  5. By now you should smell the aroma of the Chinese sausages.
  6. Bring the heat back up a notch and add in 2 handfuls of bean sprouts, and immediately follow with 2 large handfuls of the flat noodles (I’m assuming 1 large handful = 1 serving, so adjust the size of each handful according to your desired portion)
  7. Add 2 ½ tablespoons of the sauce into the wok and stir vigorously to blend evenly with the noodles.
  8. Using the spatula, create a little crater in the centre of the wok (push the rest of the contents aside), and crack 2 eggs into the empty area.
  9. Immediately use the spatula to break the egg yolks and stir to blend with the egg whites for a few seconds.
  10. Mix the noodles with the eggs and keep flipping the noodles until the eggs are distributed evenly.
  11. Add about ¼ to ½ tablespoon of chili paste (depending on how spicy you like it to be). Do a quick taste check and add a bit more sauce if you prefer the taste to be more intense/salty.
  12. Throw in the cockles (optional).
  13. Stir-fry and continue to flip the noodles off the bottom of the pan (so that nothing gets burnt) until the egg is cooked and clumped onto the noodles. If you’re using a non-stick pan, you can afford to do this a little longer to get that slightly charred “streetside wok” aroma.
  14. Add chives, throw in the pre-cooked prawns and mix in/flip the noodles a few times then dish out and serve immediately.
  15. Repeat this whole process to make another 2 servings of Char Kuey Teow using the remaining ingredients.

Use the comment box below if you have any questions and do let us know how your Char Kuey Teow turns out. Happy experimenting fellow foodies! :-D


Hainanese Chicken Rice and Squid and mushroom pasta recipe


Click here for #OOTDs and other GIRLY STUFF


Source: http://www.hannah.today/homecooked-recipes...
tags: Char Kuey Teow, kuey teow, kueh teow, kueh tiau, kueh tiaw, Penang, traditional, hawker, food, dish, foodie, recipe, recipes, fresh, how to, asian, chinese, Pulau Pinang, Penangite, typical, plate, hawker delights, DIY, hannah tan, hannah, malaysian, cooking, noodles, rice noodles, stir fry, wok, cook, home cook, home cooking, homecooked, homecooking, chilli, spicy, spice, kitchen, diary of a wife, local, flavors, flavour, flavor, flavours, yum, yummy, soy, wife, htfood
categories: Homecooking, Recipe
Friday 09.25.15
Posted by Hannah Tan
 

Hainanese Chicken Rice

Although many would suggest steaming or boiling the chicken conventionally (taking the easy way out), I wanted to achieve the same type of meat and skin texture consistency as the ones sold in proper chicken rice stalls; and that my dear friends, takes a lot of time and effort. Cooking proper Hainanese chicken rice is a painstaking process, and if it's not perfect on your first try, don't feel so bad. Practise makes perfect, and the trick is to always trust your tongue. Following a recipe to the tee may not necessarily mean you'll end up serving the perfect dish, but trusting your tongue and instincts in the process will deliver you a meal with soul.

Have fun and let me know how your turns out ya!


Chicken

Ingredients: 

  • 1 whole chicken, cleaned; access fat trimmed and reserved
  • 3 tablespoons of light soy sauce
  • 4 garlic cloves, pounded
  • 4 inch ginger, sliced
  • 2 whole spring onions
  • 1 teaspoon of sesame oil
  • 1 tablespoon of salt

Preparation:

Rub ½ tablespoon of salt evenly all over the chicken (on the outside).

Combine the balance ½ tablespoon of salt and 1½ tablespoons of light soy sauce and rub the inside of the chicken thoroughly. Pound (or blend with good processor) the garlic. Stuff the inside of the chicken with the pounded garlic, half the ginger and half the spring onion (you can choose to pound the ginger and spring onions into a paste as well – it makes a difference in taste when you rub it inside the chicken, but you may have to deal with green color remnants of the stuffing under the carcass).

Now comes the tedious part. Bring a large pot of water to the boil (not too much, the level of the water should just cover the chicken by an extra 2 inches max), then add the remaining ginger and spring onion to the boiling water. After 2 minutes, turn off the heat and gently put the chicken in. Some of the stuffing may fall out but it’s okay. ;-) Cover with a lid and leave to stand in the water for 1 hour. After the first 5 minutes, gently lift the chicken out with 2 flat spatulas into a large strainer to drain the water from its cavity, then return to the water. Repeat 2 or 3 times during the hour (this ensures that there’s enough hot water inside the chicken to cook it through). Be very gentle because the chicken skin is tender and will tear (I tried using thongs for this process the first time round, and it ended up looking like an abused chicken; bad for food presentation. ). After 30 minutes, bring the water back to almost boiling then turn the heat off again. Cooking the chicken without boiling it keeps it tender and juicy.

Check for doneness of your chicken by sticking a chopstick into the flesh under the leg and see if the juices run clear or insert a cooking thermometer into the thickest part of the thigh. It should read 170F.

Gently remove the chicken from the water (do not throw away this poaching broth) and plunge into a bath of iced water (it should have enough water to submerge the entire chicken). Doing this will stop the cooking process immediately and tighten the chicken skin, making it springy and firm.

Remove the stuffing and if you’re a perfectionist like me, you can opt to gently rinse in a second ice water bath to make sure your chicken looks “clean”.

Combine the remaining 1½ tablespoons of light soy sauce with the sesame oil and rub into the chicken (on the outside). Leave to cool before carving into serving sizes and set aside.


Stock/soup

Ingredients:

  • Leftover poaching broth
  • chicken carcass/legs/wings
  • 1 slice of ginger
  • 2 spring onions
  • 1 tablespoon of mirin (optional)
  • salt and white pepper to taste

Preparation:

For the stock/soup, add the chicken carcasses/legs/wings, ginger and spring onions to the pot of leftover poaching broth and boil on low hear for another 1 hour (or 2, if you’re really patient). Add mirin (optional), salt and white pepper to taste. Strain the stock and serve in small soup bowls. Pour hot stock over chicken and drain (optional, if you don’t want to serve “cold” chicken), then drizzle with chicken soy sauce before serving.


Rice

Ingredients: 

  • reserved chicken fat
  • 1 inch ginger, sliced
  • 4 garlic cloves, finely chopped
  • 1 big onion, halved
  • 3 cups of long-grain rice, rinsed and drained
  • 2 teaspoons of salt
  •  4 pandan leaves, tied in a knot
  • 1 teaspoon of olive oil
  • 3 ½ cups of your reserved poaching broth

Preparation: 

Heat the chicken fat in a non-stick wok until it releases oil, then add the ginger and garlic and fry until golden (be careful not to over-fry and burn otherwise you’ll end up with bitter-tasting chicken rice). Discard any solid pieces of fat. Add the rice and salt and stir-fry briskly for 1 to 2 minutes. Transfer the rice to a rice cooker and add 3½ cups of chicken stock, the pandan leaves and onion (be careful that your onion doesn’t disintegrate). Don’t wash the wok (use to prepare the chicken soy sauce later). Stir occasionally (optional). You may need to add a little more stock towards the end if the rice seems dry. When the rice is almost cooked, mix the olive oil evenly into the rice to separate the grains and give it a nice glow.


Chilli sauce

Ingredients:

  • 9 
long red chilies, seeds removed and roughly chopped
  • 2 
garlic cloves, roughly chopped
  • 2 inch piece of ginger, roughly chopped
  • 2 tablespoons of lime juice
  • 2 tablespoons of stock
  • 1 teaspoon of sugar
  • 1 teaspoon of salt

Preparation:

Pound the chilli, garlic and ginger into a paste (or blend in a food processor). Add the chicken stock, lime juice, sugar and salt to taste.


Ginger sauce

Ingredients:

  • 75g ginger, roughly chopped
  • 6 
garlic cloves, roughly chopped
  • 1 tablespoon of stock
  • ½ tablespoon of 
lime juice
  • ½ teaspoon of salt

Preparation:

Pound the ginger and garlic into a paste (or blend in a food processor). Add the chicken stock, lime juice and salt to taste.


Chicken soy sauce

Ingredients:

  • ½ teaspoon of sesame oil (whichever you prefer)
  • 3 tablespoons of light soy sauce
  • 6 tablespoons of stock
  • 1 teaspoon of sugar

Preparation: 

Combine all the ingredients and heat in the same pan in which you prepared the rice in earlier. You may choose to add in more sugar/soy sauce based on your taste preference. Pour over chicken before serving


To serve

  • sliced spring onions
  • kicap manis
  • sliced cucumber
  • blanced beansprouts drizzled with sesame oil and chicken soy sauce

Source: http://www.hannah.today/homecooked-recipes...
tags: recipe, recipes, hannah, hannah tan, chinese, food, cooking, cook, kitchen, malaysian, foodie, how to, chicken rice, chicken, rice, steamed, hainanese, ipoh, singapore, local, stock, soup, soy, ginger, chilli, wife, diary of a wife
categories: Recipe, Homecooking
Wednesday 07.23.14
Posted by Hannah Tan
 

Squid and mushroom pasta

Something you probably didn’t know about me – I love to cook! That doesn’t mean I’m a great cook.  I just love being in the kitchen and experimenting with different flavours. So yes, playing “masak-masak” was my favourite pastime as a child. How did you guess?! Lol.

I used to pretend I was a chef, and even DIY-ed a hat; which, looking back, looks nothing like a chef’s hat. Lol. Case in point... 

How good is my cooking?

Well, let’s just say that there hasn’t been any casualties reported up-to-date. Lol

Disclaimer. I’m no pro, so please forgive me if I don’t use the correct technical jargons or techniques.

Also, since everyone has a different preference in taste (ie. degree of saltiness, sweetness, threshold for sourness, etc), try not to follow my measurements to the tee. While I like full flavours in my food, it may be too intense for some. Hence, I encourage you to keep tasting as you cook. That’s what makes it all so fun, really; the process of experimenting until you find the perfect taste, for you. :-)

So here we go.

Squid and mushroom pasta.

#htTIP: If you prefer to go vegetarian, simply omit the squid ;-)

Ingredients:

The things you’ll need (I’m assuming that salt and cooking oil is something that is readily available in your kitchen :-D):

1) Pasta – cooked, al dente. I prefer angel hair pasta, but you can use spaghetti or whichever type of pasta you like best. For that special flavour, I like to add a bit of salt and chicken stock into the water that I boil the pasta in. Also, to prevent the pasta from sticking together, a few drops of olive oil should do the trick. Feel free to let me know if you'd like me to do a separate post on “How to cook perfect pasta”. 

2) Fresh squid – cleaned and skinned.

3) Buna-shimeji/brown-beech mushrooms

4) Mini king oyster mushrooms  

5) Onion

6) Tomato puree (1 can for 2 servings)

7) Italian herbs – or if you have fresh basil, rosemary, oregano and parsley, even better!

8 ) Ponzu sauce - if you can’t get a hold of this, you can substitute it with a mixture of soya sauce, vinegar and a squeeze of lemon

9) Butter – I prefer salted butter, but you can the unsalted version if you like

10) Garlic powder

11) White pepper

12) Sugar (brown/white)

13) 1 slice of cheese – My secret ingredient. I always opt for the full flavoured cheddar. Yum!

14) Light soya sauce

15) Mirin – this is my must-have in the kitchen. Nevertheless, if you can’t get a hold of this, you can use sugar as a substitute.


Preparation:

a) Cut the squid according to your desired thickness. I usually cut them to an inch as they’ll shrink later, in the heat.

b) Mince the onions

#htTIP: Chewing gum while cutting onions prevent you from crying.

Basically, chewing gum while cutting onions prevents tears, by forcing you to breathe through your mouth. This disperses the irritant released by the onion, so that a significantly smaller amount reaches the lachrymal glands, preventing them from being irritated enough to release tears. [Referenced from ehow.com] Click here to read more.

c) Clean and cut the buna-shimeji mushrooms from the base (if you bought it in a cluster, like I did)

d) Thinly slice the mini king oyster mushrooms


Cooking:

e) On medium heat, pan-fry the mini king oyster mushrooms with a slice of butter and a pinch of salt, until tender. Preferably, using a non-stick wok/pan. Set aside (sprinkle some parsley flakes and black pepper if you like ;-))

f) In the same heated pan, add 1 to 2 tablespoons of ponzu sauce (depending on how many mushrooms you have), a pinch of sugar and throw the buna-shimeji mushrooms in. Mix well and stir fry until all the sauce is absorbed into the mushrooms. Set aside.

g) In the same heated pan, add 1 tablespoon of oil (I like to use olive oil) and pan fry the minced onions until slightly brown. Do not overcook. Your onions should be tender but not too soft. Set aside.

h) In the same heated pan (you should have a bit of leftover oil from pan frying the onions), stir fry the squid until half cooked. Add a pinch of salt before dishing it out. Set aside and leave the “juice” from the squid behind in the pan.

i) In the same heated pan, pour in the tomato puree (mix with the leftover "juice" from stir frying the squid). Turn the heat down, unless you want hot tomato sauce splashing on you as you cook. Add 2 sprinkles of garlic powder, 1 sprinkle of Italian herbs, a teaspoon of chicken stock (optional), pepper and salt to taste. Once you get the desired degree of saltiness/spice, add in 1 tablespoon of mirin (or substitute with a generous pinch of sugar). Adjust and add more salt/pepper according to your preferred taste.

j) Once you are happy with the taste, add the onions into the sauce. Mix well.

k) Dissolve the slice of cheese into the sauce. Mix well. Can you taste the difference? :-D

#htTIP: I would probably get told off by the proper chefs for doing this, but for me, dissolving a slice of cheese into any tomato based pasta sauce always helps balance the tanginess of the tomato. My little secret!

l) Finally, and you must make sure that you do this last – throw in the squid, mix evenly and turn off the heat as soon as you see the edges of the squid start to curl. Do not overcook, unless you like the idea of chewing on rubber. 

m) Time to plate your dish. Put a serving of pasta on a plate, pour a generous amount of sauce onto it, and top with the mushrooms. Add a sprinkle of parsley flakes and a dash of black pepper if you like.


Technically, you can actually dump the onions, mushrooms and squid into the tomato puree for a much simpler job, and you’d still have a pretty edible pasta sauce. Edible, not yummy.  I personally, prefer to detail my food. I believe that each dish/meal should consist of different layers of flavours. It gives depth to the taste and a treat to the worthy tongue.

At the base, the pasta should already have a bit of flavor from the chicken stock. And sitting on it is a nice tangy but not too overpowering sauce with squid slices that are cooked just right. The buttery flavour of the tender yet chewy mini king oyster mushrooms will give the tanginess of the sauce a nice balance, while the ponzu flavoured buna-shimeji mushrooms will provide you with that special twist of flavour to the overall meal.

Dig in and enjoy as the different layers of flavours unfold in your mouth with each bite. Bon appétit! 


Source: http://www.hannah.today/homecooked-recipes...
tags: recipe, recipes, fusion, italian, asian, japanese, flavour, flavor, flavors, flavours, cook, cooking, kitchen, food, foodie, hannah tan, hannah, how to, httip, malaysian, diary of a wife, wife, stock, pasta, angel hair, mushroom, squid, calamari, tomato, base, sauch, chicken, taste, yum, yummy, fresh, shimeji, king oyster mushroom, cheese
categories: Recipe, Homecooking
Wednesday 06.18.14
Posted by Hannah Tan
 

www.hannahtan.com