• Home
  • About
  • Food&Travel
  • GIRLYSTUFF
  • EVERYTHINGINBETWEEN
  • Contact
www.hannahtan.com |

Making The Difference

  • Home
  • About
  • Food&Travel
  • GIRLYSTUFF
  • EVERYTHINGINBETWEEN
  • Contact

Hainanese Chicken Rice

Although many would suggest steaming or boiling the chicken conventionally (taking the easy way out), I wanted to achieve the same type of meat and skin texture consistency as the ones sold in proper chicken rice stalls; and that my dear friends, takes a lot of time and effort. Cooking proper Hainanese chicken rice is a painstaking process, and if it's not perfect on your first try, don't feel so bad. Practise makes perfect, and the trick is to always trust your tongue. Following a recipe to the tee may not necessarily mean you'll end up serving the perfect dish, but trusting your tongue and instincts in the process will deliver you a meal with soul.

Have fun and let me know how your turns out ya!


Chicken

Ingredients: 

  • 1 whole chicken, cleaned; access fat trimmed and reserved
  • 3 tablespoons of light soy sauce
  • 4 garlic cloves, pounded
  • 4 inch ginger, sliced
  • 2 whole spring onions
  • 1 teaspoon of sesame oil
  • 1 tablespoon of salt

Preparation:

Rub ½ tablespoon of salt evenly all over the chicken (on the outside).

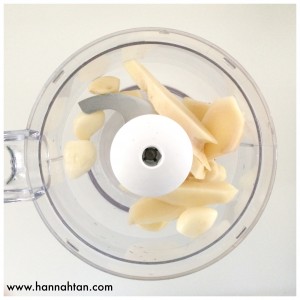
Combine the balance ½ tablespoon of salt and 1½ tablespoons of light soy sauce and rub the inside of the chicken thoroughly. Pound (or blend with good processor) the garlic. Stuff the inside of the chicken with the pounded garlic, half the ginger and half the spring onion (you can choose to pound the ginger and spring onions into a paste as well – it makes a difference in taste when you rub it inside the chicken, but you may have to deal with green color remnants of the stuffing under the carcass).

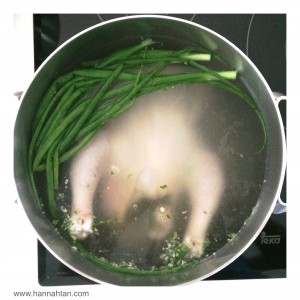
Now comes the tedious part. Bring a large pot of water to the boil (not too much, the level of the water should just cover the chicken by an extra 2 inches max), then add the remaining ginger and spring onion to the boiling water. After 2 minutes, turn off the heat and gently put the chicken in. Some of the stuffing may fall out but it’s okay. ;-) Cover with a lid and leave to stand in the water for 1 hour. After the first 5 minutes, gently lift the chicken out with 2 flat spatulas into a large strainer to drain the water from its cavity, then return to the water. Repeat 2 or 3 times during the hour (this ensures that there’s enough hot water inside the chicken to cook it through). Be very gentle because the chicken skin is tender and will tear (I tried using thongs for this process the first time round, and it ended up looking like an abused chicken; bad for food presentation. ). After 30 minutes, bring the water back to almost boiling then turn the heat off again. Cooking the chicken without boiling it keeps it tender and juicy.

Check for doneness of your chicken by sticking a chopstick into the flesh under the leg and see if the juices run clear or insert a cooking thermometer into the thickest part of the thigh. It should read 170F.

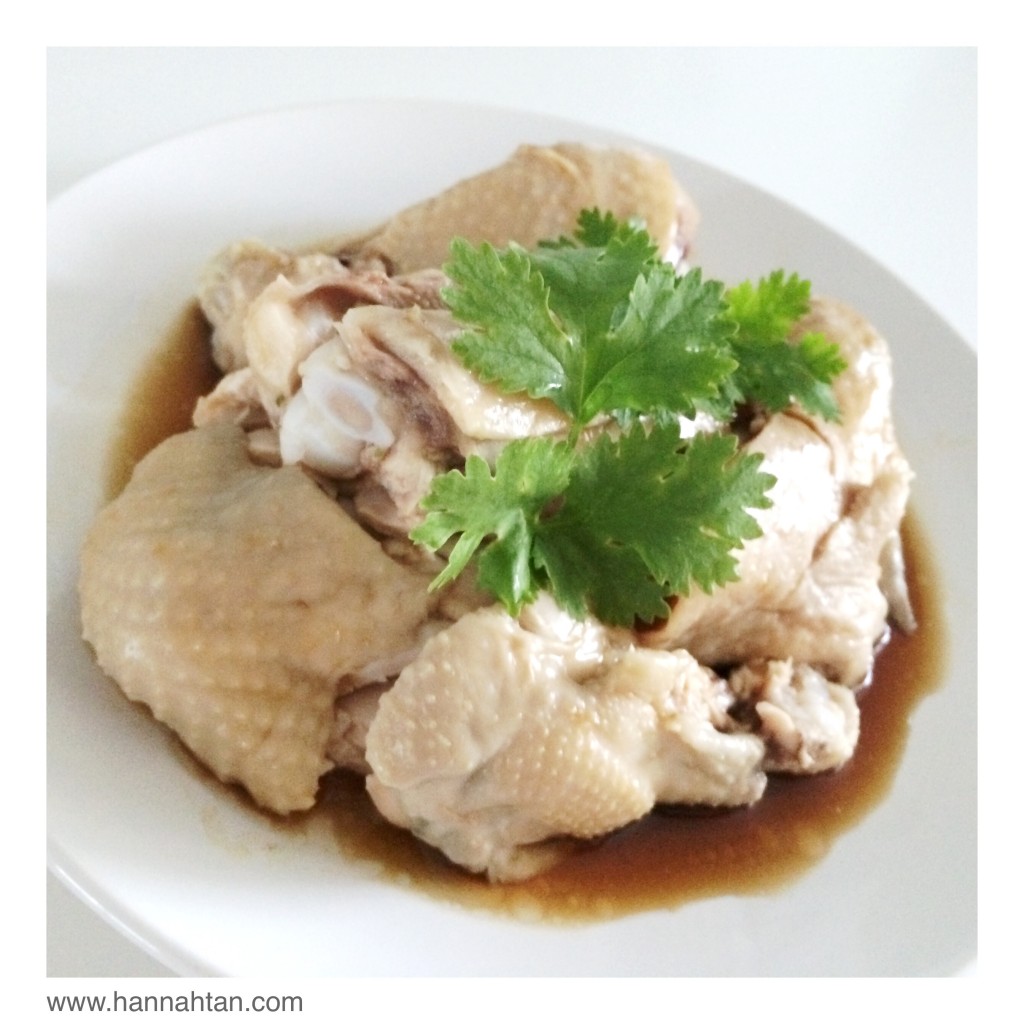
Gently remove the chicken from the water (do not throw away this poaching broth) and plunge into a bath of iced water (it should have enough water to submerge the entire chicken). Doing this will stop the cooking process immediately and tighten the chicken skin, making it springy and firm.

Remove the stuffing and if you’re a perfectionist like me, you can opt to gently rinse in a second ice water bath to make sure your chicken looks “clean”.

Combine the remaining 1½ tablespoons of light soy sauce with the sesame oil and rub into the chicken (on the outside). Leave to cool before carving into serving sizes and set aside.


Stock/soup

Ingredients:

  • Leftover poaching broth
  • chicken carcass/legs/wings
  • 1 slice of ginger
  • 2 spring onions
  • 1 tablespoon of mirin (optional)
  • salt and white pepper to taste

Preparation:

For the stock/soup, add the chicken carcasses/legs/wings, ginger and spring onions to the pot of leftover poaching broth and boil on low hear for another 1 hour (or 2, if you’re really patient). Add mirin (optional), salt and white pepper to taste. Strain the stock and serve in small soup bowls. Pour hot stock over chicken and drain (optional, if you don’t want to serve “cold” chicken), then drizzle with chicken soy sauce before serving.


Rice

Ingredients: 

  • reserved chicken fat
  • 1 inch ginger, sliced
  • 4 garlic cloves, finely chopped
  • 1 big onion, halved
  • 3 cups of long-grain rice, rinsed and drained
  • 2 teaspoons of salt
  •  4 pandan leaves, tied in a knot
  • 1 teaspoon of olive oil
  • 3 ½ cups of your reserved poaching broth

Preparation: 

Heat the chicken fat in a non-stick wok until it releases oil, then add the ginger and garlic and fry until golden (be careful not to over-fry and burn otherwise you’ll end up with bitter-tasting chicken rice). Discard any solid pieces of fat. Add the rice and salt and stir-fry briskly for 1 to 2 minutes. Transfer the rice to a rice cooker and add 3½ cups of chicken stock, the pandan leaves and onion (be careful that your onion doesn’t disintegrate). Don’t wash the wok (use to prepare the chicken soy sauce later). Stir occasionally (optional). You may need to add a little more stock towards the end if the rice seems dry. When the rice is almost cooked, mix the olive oil evenly into the rice to separate the grains and give it a nice glow.


Chilli sauce

Ingredients:

  • 9 
long red chilies, seeds removed and roughly chopped
  • 2 
garlic cloves, roughly chopped
  • 2 inch piece of ginger, roughly chopped
  • 2 tablespoons of lime juice
  • 2 tablespoons of stock
  • 1 teaspoon of sugar
  • 1 teaspoon of salt

Preparation:

Pound the chilli, garlic and ginger into a paste (or blend in a food processor). Add the chicken stock, lime juice, sugar and salt to taste.


Ginger sauce

Ingredients:

  • 75g ginger, roughly chopped
  • 6 
garlic cloves, roughly chopped
  • 1 tablespoon of stock
  • ½ tablespoon of 
lime juice
  • ½ teaspoon of salt

Preparation:

Pound the ginger and garlic into a paste (or blend in a food processor). Add the chicken stock, lime juice and salt to taste.


Chicken soy sauce

Ingredients:

  • ½ teaspoon of sesame oil (whichever you prefer)
  • 3 tablespoons of light soy sauce
  • 6 tablespoons of stock
  • 1 teaspoon of sugar

Preparation: 

Combine all the ingredients and heat in the same pan in which you prepared the rice in earlier. You may choose to add in more sugar/soy sauce based on your taste preference. Pour over chicken before serving


To serve

  • sliced spring onions
  • kicap manis
  • sliced cucumber
  • blanced beansprouts drizzled with sesame oil and chicken soy sauce

Source: http://www.hannah.today/homecooked-recipes...
tags: recipe, recipes, hannah, hannah tan, chinese, food, cooking, cook, kitchen, malaysian, foodie, how to, chicken rice, chicken, rice, steamed, hainanese, ipoh, singapore, local, stock, soup, soy, ginger, chilli, wife, diary of a wife
categories: Recipe, Homecooking
Wednesday 07.23.14
Posted by Hannah Tan
 

Squid and mushroom pasta

Something you probably didn’t know about me – I love to cook! That doesn’t mean I’m a great cook.  I just love being in the kitchen and experimenting with different flavours. So yes, playing “masak-masak” was my favourite pastime as a child. How did you guess?! Lol.

I used to pretend I was a chef, and even DIY-ed a hat; which, looking back, looks nothing like a chef’s hat. Lol. Case in point... 

How good is my cooking?

Well, let’s just say that there hasn’t been any casualties reported up-to-date. Lol

Disclaimer. I’m no pro, so please forgive me if I don’t use the correct technical jargons or techniques.

Also, since everyone has a different preference in taste (ie. degree of saltiness, sweetness, threshold for sourness, etc), try not to follow my measurements to the tee. While I like full flavours in my food, it may be too intense for some. Hence, I encourage you to keep tasting as you cook. That’s what makes it all so fun, really; the process of experimenting until you find the perfect taste, for you. :-)

So here we go.

Squid and mushroom pasta.

#htTIP: If you prefer to go vegetarian, simply omit the squid ;-)

Ingredients:

The things you’ll need (I’m assuming that salt and cooking oil is something that is readily available in your kitchen :-D):

1) Pasta – cooked, al dente. I prefer angel hair pasta, but you can use spaghetti or whichever type of pasta you like best. For that special flavour, I like to add a bit of salt and chicken stock into the water that I boil the pasta in. Also, to prevent the pasta from sticking together, a few drops of olive oil should do the trick. Feel free to let me know if you'd like me to do a separate post on “How to cook perfect pasta”. 

2) Fresh squid – cleaned and skinned.

3) Buna-shimeji/brown-beech mushrooms

4) Mini king oyster mushrooms  

5) Onion

6) Tomato puree (1 can for 2 servings)

7) Italian herbs – or if you have fresh basil, rosemary, oregano and parsley, even better!

8 ) Ponzu sauce - if you can’t get a hold of this, you can substitute it with a mixture of soya sauce, vinegar and a squeeze of lemon

9) Butter – I prefer salted butter, but you can the unsalted version if you like

10) Garlic powder

11) White pepper

12) Sugar (brown/white)

13) 1 slice of cheese – My secret ingredient. I always opt for the full flavoured cheddar. Yum!

14) Light soya sauce

15) Mirin – this is my must-have in the kitchen. Nevertheless, if you can’t get a hold of this, you can use sugar as a substitute.


Preparation:

a) Cut the squid according to your desired thickness. I usually cut them to an inch as they’ll shrink later, in the heat.

b) Mince the onions

#htTIP: Chewing gum while cutting onions prevent you from crying.

Basically, chewing gum while cutting onions prevents tears, by forcing you to breathe through your mouth. This disperses the irritant released by the onion, so that a significantly smaller amount reaches the lachrymal glands, preventing them from being irritated enough to release tears. [Referenced from ehow.com] Click here to read more.

c) Clean and cut the buna-shimeji mushrooms from the base (if you bought it in a cluster, like I did)

d) Thinly slice the mini king oyster mushrooms


Cooking:

e) On medium heat, pan-fry the mini king oyster mushrooms with a slice of butter and a pinch of salt, until tender. Preferably, using a non-stick wok/pan. Set aside (sprinkle some parsley flakes and black pepper if you like ;-))

f) In the same heated pan, add 1 to 2 tablespoons of ponzu sauce (depending on how many mushrooms you have), a pinch of sugar and throw the buna-shimeji mushrooms in. Mix well and stir fry until all the sauce is absorbed into the mushrooms. Set aside.

g) In the same heated pan, add 1 tablespoon of oil (I like to use olive oil) and pan fry the minced onions until slightly brown. Do not overcook. Your onions should be tender but not too soft. Set aside.

h) In the same heated pan (you should have a bit of leftover oil from pan frying the onions), stir fry the squid until half cooked. Add a pinch of salt before dishing it out. Set aside and leave the “juice” from the squid behind in the pan.

i) In the same heated pan, pour in the tomato puree (mix with the leftover "juice" from stir frying the squid). Turn the heat down, unless you want hot tomato sauce splashing on you as you cook. Add 2 sprinkles of garlic powder, 1 sprinkle of Italian herbs, a teaspoon of chicken stock (optional), pepper and salt to taste. Once you get the desired degree of saltiness/spice, add in 1 tablespoon of mirin (or substitute with a generous pinch of sugar). Adjust and add more salt/pepper according to your preferred taste.

j) Once you are happy with the taste, add the onions into the sauce. Mix well.

k) Dissolve the slice of cheese into the sauce. Mix well. Can you taste the difference? :-D

#htTIP: I would probably get told off by the proper chefs for doing this, but for me, dissolving a slice of cheese into any tomato based pasta sauce always helps balance the tanginess of the tomato. My little secret!

l) Finally, and you must make sure that you do this last – throw in the squid, mix evenly and turn off the heat as soon as you see the edges of the squid start to curl. Do not overcook, unless you like the idea of chewing on rubber. 

m) Time to plate your dish. Put a serving of pasta on a plate, pour a generous amount of sauce onto it, and top with the mushrooms. Add a sprinkle of parsley flakes and a dash of black pepper if you like.


Technically, you can actually dump the onions, mushrooms and squid into the tomato puree for a much simpler job, and you’d still have a pretty edible pasta sauce. Edible, not yummy.  I personally, prefer to detail my food. I believe that each dish/meal should consist of different layers of flavours. It gives depth to the taste and a treat to the worthy tongue.

At the base, the pasta should already have a bit of flavor from the chicken stock. And sitting on it is a nice tangy but not too overpowering sauce with squid slices that are cooked just right. The buttery flavour of the tender yet chewy mini king oyster mushrooms will give the tanginess of the sauce a nice balance, while the ponzu flavoured buna-shimeji mushrooms will provide you with that special twist of flavour to the overall meal.

Dig in and enjoy as the different layers of flavours unfold in your mouth with each bite. Bon appétit! 


Source: http://www.hannah.today/homecooked-recipes...
tags: recipe, recipes, fusion, italian, asian, japanese, flavour, flavor, flavors, flavours, cook, cooking, kitchen, food, foodie, hannah tan, hannah, how to, httip, malaysian, diary of a wife, wife, stock, pasta, angel hair, mushroom, squid, calamari, tomato, base, sauch, chicken, taste, yum, yummy, fresh, shimeji, king oyster mushroom, cheese
categories: Recipe, Homecooking
Wednesday 06.18.14
Posted by Hannah Tan
 

www.hannahtan.com